How to Roll Out Security Tools: The 'Crawl, Walk, Run' Framework
Summary: The Phased Approach
This step-by-step approach helps you roll out security tools smoothly and keeps your builds running. Think of it as a series of small steps that safeguard your shipping, ensuring a more reliable and secure development process.
| Scan Mode | Developer Impact | Configuration / Setup | Purpose & Outcome |
|---|---|---|---|
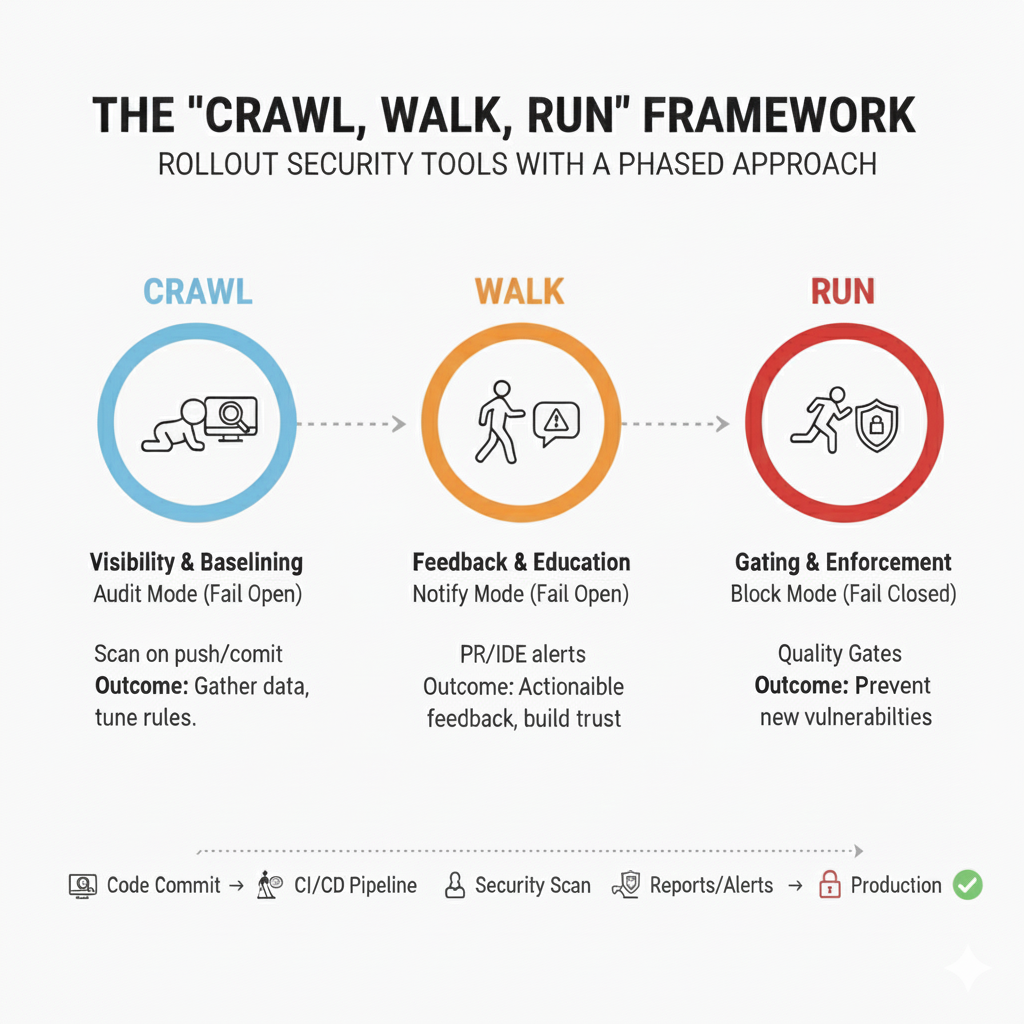
| Crawl Fail Open (Audit Mode, No alerts) | No disruption; invisible to developers | Scan on every push/commit, log findings | Gather data, tune rules, suppress false positives; builds always pass |
| Walk Fail Open (Notify Mode, alerts) | Developers see warnings in PRs/IDEs | Enable PR decoration/IDE plugins | Developers receive actionable feedback, build trust, fix issues voluntarily |
| Run Fail Closed (Block Mode) | Builds blocked on high/critical issues | Activate quality gates, block build on new critical findings | Prevents new vulnerabilities reaching production; developers respect failures |
Introduction: Why “Big Bang” Rollouts Fail
A DevSecOps project can quickly go off track with a “Big Bang” rollout. This often happens when a team gets a new SAST or Container Scanner tool and turns on “Block Mode” right away. For example, a software development team at XYZ Corp once enabled “Block Mode” on the first day with their new scanner tool.

Overnight, the tool flagged hundreds of minor security issues that needed urgent attention, effectively halting their entire development process.
As developers scrambled to resolve these issues, critical project deadlines were missed, leading to frustration and a loss of trust in the tool. This scenario highlights the risks and illustrates why a more gradual approach is necessary.
The result usually leads to problems:
- Broken Builds: Developers are unable to deploy critical fixes.
- Alert Fatigue: A flood of false positives overwhelms the team.
- Shadow IT: Frustrated teams bypass security checks to keep their work moving.
To avoid these problems, take an evolutionary approach instead of trying to change everything at once. That’s what the Crawl, Walk, Run framework is all about.
Recent studies have shown that organizations implementing phased rollouts experience a measurable improvement in deployment frequency and faster failure recovery, thereby enhancing the reliability of their DevSecOps practices.
By linking this framework to proven performance outcomes, like reduced downtime and increased build success rates, we can ensure that engineering leaders recognize its value.
Phase 1: Crawl (Visibility & Baselining)
Goal: Gain full visibility into your existing technical debt while avoiding disruption to developer workflows. Aim to achieve 90% repository coverage within the first two weeks to ensure measurable success and clear progress benchmarks.
- In this initial phase, focus on data collection by integrating the security tool into your CI/CD pipeline in a non-intrusive way.
- Configuration: Set the tool to Fail Open using Audit Mode—logging all findings without notifying developers or blocking builds.
- Action: Trigger scans on every code push or commit.
- Outcome: The scanner logs all findings to a dashboard while allowing all builds to pass successfully, even if critical vulnerabilities are detected.
💡 Pro Tip: Use this phase to carefully tune your scanner. If a specific rule (e.g., “Magic Numbers in Code”) triggers excessive noise (e.g., 500 times across repos), consider tuning or temporarily disabling it to focus on actionable issues before moving forward.
Why this matters: Establishing this “Safety Baseline” lets your security team understand the volume and nature of existing technical debt and refine rule configurations without impacting deployments.
Phase 2: Walk (Feedback & Education)
Goal: Provide developers with actionable, timely security feedback integrated into their everyday workflows, without blocking development progress.
- Once noise is reduced, make findings visible to developers. Keep the tool in Fail Open mode, but switch to Notify Mode by enabling alerts.
- Configuration: Integrate feedback into development tools such as Pull Request decoration (comments) or IDE plugins.
- Outcome: Developers receive real-time security feedback in their code review process, e.g., “⚠️ High Severity: Hardcoded secret introduced on line 42.”
Developers can choose to fix the issue immediately or document false positives for resolution later.
Why this matters: This phase builds trust between security and developers. Security is seen as a collaborative guide, not a gatekeeper. Developers become accustomed to the tool’s presence and begin voluntarily fixing issues because the feedback loop is direct and actionable.
To reinforce these positive behaviors, encourage teams to celebrate early wins. Sharing quick success stories, such as the ‘first PR merged with zero High findings,’ builds momentum and nudges more developers toward voluntary fixes.
Phase 3: Run (Gating & Enforcement)
Goal: Prevent new high-risk vulnerabilities from reaching production by enforcing security gates.
- After tuning and educating developers, activate Build Breakers or Quality Gates that enforce policies by blocking builds with critical issues.
- Configuration: Set the tool to Fail Closed mode to stop builds with High and Critical severity vulnerabilities. Medium and low-severity issues remain as warnings to avoid excessive disruption.
- Important nuance: Consider blocking only on new vulnerabilities introduced by the current changes (e.g., in the current PR), while tracking existing issues as backlog items to be remediated over time.
- Outcome: If a developer introduces, for example, a critical SQL Injection vulnerability, the build fails and cannot be merged until fixed or a documented waiver is approved.
Why this matters: Because the tool and team are well-tuned and educated, the false positive rate is low. Developers respect build failures as true security signals rather than fighting them.
Up Next
Now that you have a phased strategy for when to block builds, the next step is deciding where to integrate these tools to maximize developer productivity.
In the next article, we will explore Frictionless Security, a way to embed security tools seamlessly into developer IDEs and PR workflows, reducing context switching and increasing adoption.
Frequently Asked Questions (FAQ)
What is the “Crawl, Walk, Run” framework?
It’s a simple step-by-step way to start using new security tools without causing problems. First, you collect information quietly (Crawl). Next, you show developers the issues so they can learn and fix them (Walk). Finally, you block bad code to keep your software safe (Run). This helps teams adopt security tools smoothly and gain trust along the way.
Why shouldn’t we block builds right away?
If you block builds from day one, the tool might flag too many issues at once, stopping developers from doing their work. This can cause frustration and slow down projects. Starting slowly means you find and fix the noisy alerts first, so blocking happens only when the tool is accurate and trusted.
How long should each step take?
Usually, the Crawl phase lasts a couple of weeks while you gather enough data. The Walk phase takes more time as developers get used to seeing alerts and fixing problems. Only move to Run when the tool is well tuned and the team is comfortable fixing issues before code gets merged.
What is “Fail Open” and when do we use it?
“Fail Open” means the tool finds issues but doesn’t stop the code from merging. Use this in Crawl and Walk phases to avoid disturbing the developers while you gather data and teach them about the issues.